My Garden of Eden

So today, I want to update everyone on the progress of my greenhouse. I have decided that my GardenTenders blog will be where all the info on the greenhouse will be.

Since the base of the greenhouse will be 2×4’s, which have not been treated, I had to come up with a plan to protect the wood from the soil, water and rotting. Originally, I was going to buy cedar 2×4s, about $8.00 USD for an 8 foot 2×4. I decided that since I already had a lot of 2×4s, that was not a good idea. I am now planning on putting cement patio stone blocks 8”W x 16”L x 2”H as a base for the greenhouse. I am thinking it will provide enough flexibility so I can put in tie downs to hold the greenhouse in place. I anticipate that I will need about 27 of these blocks and I have about 24 of these on hand, so the solution to the problem seems to be solved.

Next on building the sidewalls, how was I going to join the 2×4s together. Since I lacked an air compressor, an air gun seemed out of the question. I build many things with the Kreg Pocket Hole Jig, so that is my answer. The pocket hole screws go into the wood at an angle which is perfect for framing construction. Each Joint will have three screws, one centered on one side of the 2×4 and on the other side will be 2 more screws located toward the edge of the wood. This should create a a strong joint. I am not using the HD screws which are a bit heavier, but am using 2 1/2” coated pocket hole screws with coarse thread for exterior use.

Layout of the side walls. Two will be required.

List of Materials
4 – 2×4 8 foot at $3.10 Each = $12.40
10 – 2×4 32 inches at $1.03 Each = $10.30
60 2 1/2” Exterior Pocket Hole Screws at $0.1096 Each = $6.58
Total cost of side walls = $29.28

Prices per Lowes. Price of 2×4s is premium quality.

The side walls are made and waiting to be set up.

— Steve, Carmel, Maine, USA (near Bangor) (Hardiness Zone 5a)

After looking at Ana White’s Barn Greenhouse, I decided that was what I wanted to build. The plans for her greenhouse are at, http://ana-white.com/2012/05/plans/barn-greenhouse and looks like this:

My greenhouse will be similar with a barn style roof, but will not be roofing panels such as used on Ana’s greenhouse.I am hoping to use vinyl sheeting which is very clear and more in line with my cost structure. I have enough 2×4 to do the base frame of the greenhouse. The 2×4s came from a fence I had around the garden which I recently removed. The neighbor’s chickens had invaded my garden, so I ended up putting a fence around it.

I decided to make greenhouse 8 feet long, primarily because I cannot fit longer wood lengths in my van. In addition, I will put a doorway at both ends of the greenhouse. That will allow me to add 8 foot sections to my greenhouse. At some point the greenhouse may be 24 feet long. The town I live in has essentially no building code except for life and safety code. The building inspector told me he could keep a building permit open for 2 years. So I can take my time with the construction.

So far, I have started constructing the base wall using the 2×4s I have on hand. I will put either cedar or cement blocks under the greenhouse frame to protect the wood from rotting. Most likely will be the cedar. I am using the Kreg system to attach the 2×4s to each other. I am using 3 screws for each joint. Two screws on one side of the 2×4 and one screw centered on the other side of the 2×4. I am also using my Miter saw to make sure all the ends are square.

The setup I am using to pre-drill the holes for the Kreg system.

Partially completed frame for the first side. Once all the base frames are completed, I will put them together on the permanent site for the greenhouse.

— Steve, Carmel, Maine, USA (near Bangor) (Hardiness Zone 5a)

Garden Boxes

Garden Boxes

Garden Boxes

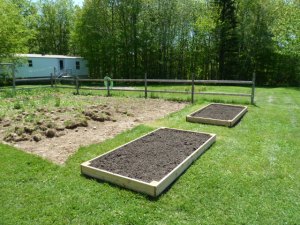
I had started turning over the soil by hand with a spading fork and at other times using a  mattock. Underneath the sod was stony soil, not really a loam. The land had been stripped of it’s loam many years ago, before I ever saw the place I would call home. We had just had a week of cold rainy weather, so nothing had been done, so I was looking for other approaches to my dilemma.

I had been shopping for cedar wood to make an Adirondack Chair, at Lowes, I had seen cedar decking. This could be just the thing, not quite as high as I would like, but with cedar, it would stand up to the soil without the use of pressure treated wood. So that’s what I did. I bought 6 – 8 foot cedar decking boards, they are 1 inch thick and 5 1/2 inches wide. For the corners, I used 2 x 4 cedar; I cut the 2 x 4 into 5 1/2 inch lengths. I screwed 2 of the 2 x 4 pieces together to make a 4 x 4 corner. Then I just screwed the decking boards into the corner posts.

The final dimensions of each garden Box is 4 foot x 8 foot. I left 4 1/2 feet between each box, so I can get my lawn tractor between the boxes for mowing. I am planning to put in 2 or four more boxes, depending on the difficulties I am presented with and the need to get the garden going as soon as possible.


Inside Grow Rack

ImageI built my own grow rack using the dimensions of my flats, about 10.5″ by 21″ . My design was to have the lights to be fixed and the plant shelves to be movable up or down by 4″ increments. The original lights were the lights at the top. There were to be 3 growing spaces, each with a height of 24″. This was fine with my original lights which are actually under the counter lights, attached directly to the bottom of the top shelf. Each one supported an 18″ T-8 bulb, 15 watts, giving an awesome 410 lumins. I originally mounted 2 lights for each shelf, yielding 820 lumins.  The plants started getting leggy and the leaves were yellowing, so I put my extra light on one of the shelves, now I had 1230 lumins.

I began to realize I needed to add more light to this grow rack. I searched through the Amazon website and came down to two lights I could choose from, a 2 foot 2 bulb T-5 fixture and a 2 foot 4 bulb t-5 fixture, 4000 and 8000 lumins respectively. I debated these two options for awhile, finally deciding the two bulb fixture might be too weak and went with the 4 bulb fixture. What was 8000 lumins going to do to my plants?

When the fixture arrived, I rearranged my lights, I put all 5 strip lights on the top shelf, giving me 2050 lumins and the new light was mounted hanging from the second shelf, giving me 8000 lumins. So, I should be seeing some action with my plants now. The problem with the new light is that it hung down for the shelf, so I had lost about 5 inches of space in my 24 inch growing space. The pots, the plants were planted in took up about 4 inches of space, so I now, only had 13 inches of space that the plant could grow in. Maybe OK for spinach and some other low growing plants, but not for tomatoes or peppers.

So, I now need to redesign the entire grow rack. I have decided to use the current rack for seedlings and low growing plants, I can still add another light to the bottom tier, but for now am using it for storage of my grow rack equipment and supplies.

I am planning a new grow rack for winter growing, might be sooner if the weather is not good in the summer, The new rack will have 2 tiers, giving 36 inches of growing space, I plan on making the center shelf movable, so if the bottom tier needs more height, then the light can be moved up or down in 4 inch increments or the center shelf can be totally removed. I plan on buying a 4 foot 8 bulb T-5 fixture, cost about $190. So, I am getting into this pretty deeply at this point. I have also considered a 125 watt CFL fixture, cost is only $54, but the light is concentrated in the center and dissipates as you go away from the center. I have decided that I want the same intensity all the way across my plant shelf. The CFL would have required more of a square configuration of the plant growing area, which is also problematic on my space. I have limited space, but can see how I can rearrange my area to afford space for the new fixture, the grow rack will be 24″ x 48″ in growing space, 8 square feet and if I use two fixtures in my grow rack, that will be 16 square feet of space. People have outside gardens that size. Considering all my growing space, I will have 20 square feet of growing space.

I have seen in write ups that people are growing cucumbers, carrots, tomatoes and peppers in their grow racks. One final note, the new T-5 fluorescent tubes and the CFLs give off very low amount of heat and do not need to vent the extra heat, unlike some of the more expensive older generation lighting, which requires venting. These new lights, make growing food inside a realistic option, not to say avoiding the GMOs.

I have decided to start a new blog about my gardening adventures. Not only gardening in the outside fighting the Maine climate, but am also starting a grow room of sorts in my home. The grow room is really my bedroom, as I have very limited space. I think this blog will be more about the inside garden rather than the outside garden.

In trying to start my grow room, I searched all over the net, not finding much info about grow rooms, except for those who were growing medical marijuana. That is not my objective, to grow smoking herbs.

So as I piece my garden together I will be writing about all the things that are important to know about growing vegetables and herbs inside and outside.